THE BUILDING INSPECTOR'S NOTEBOOK
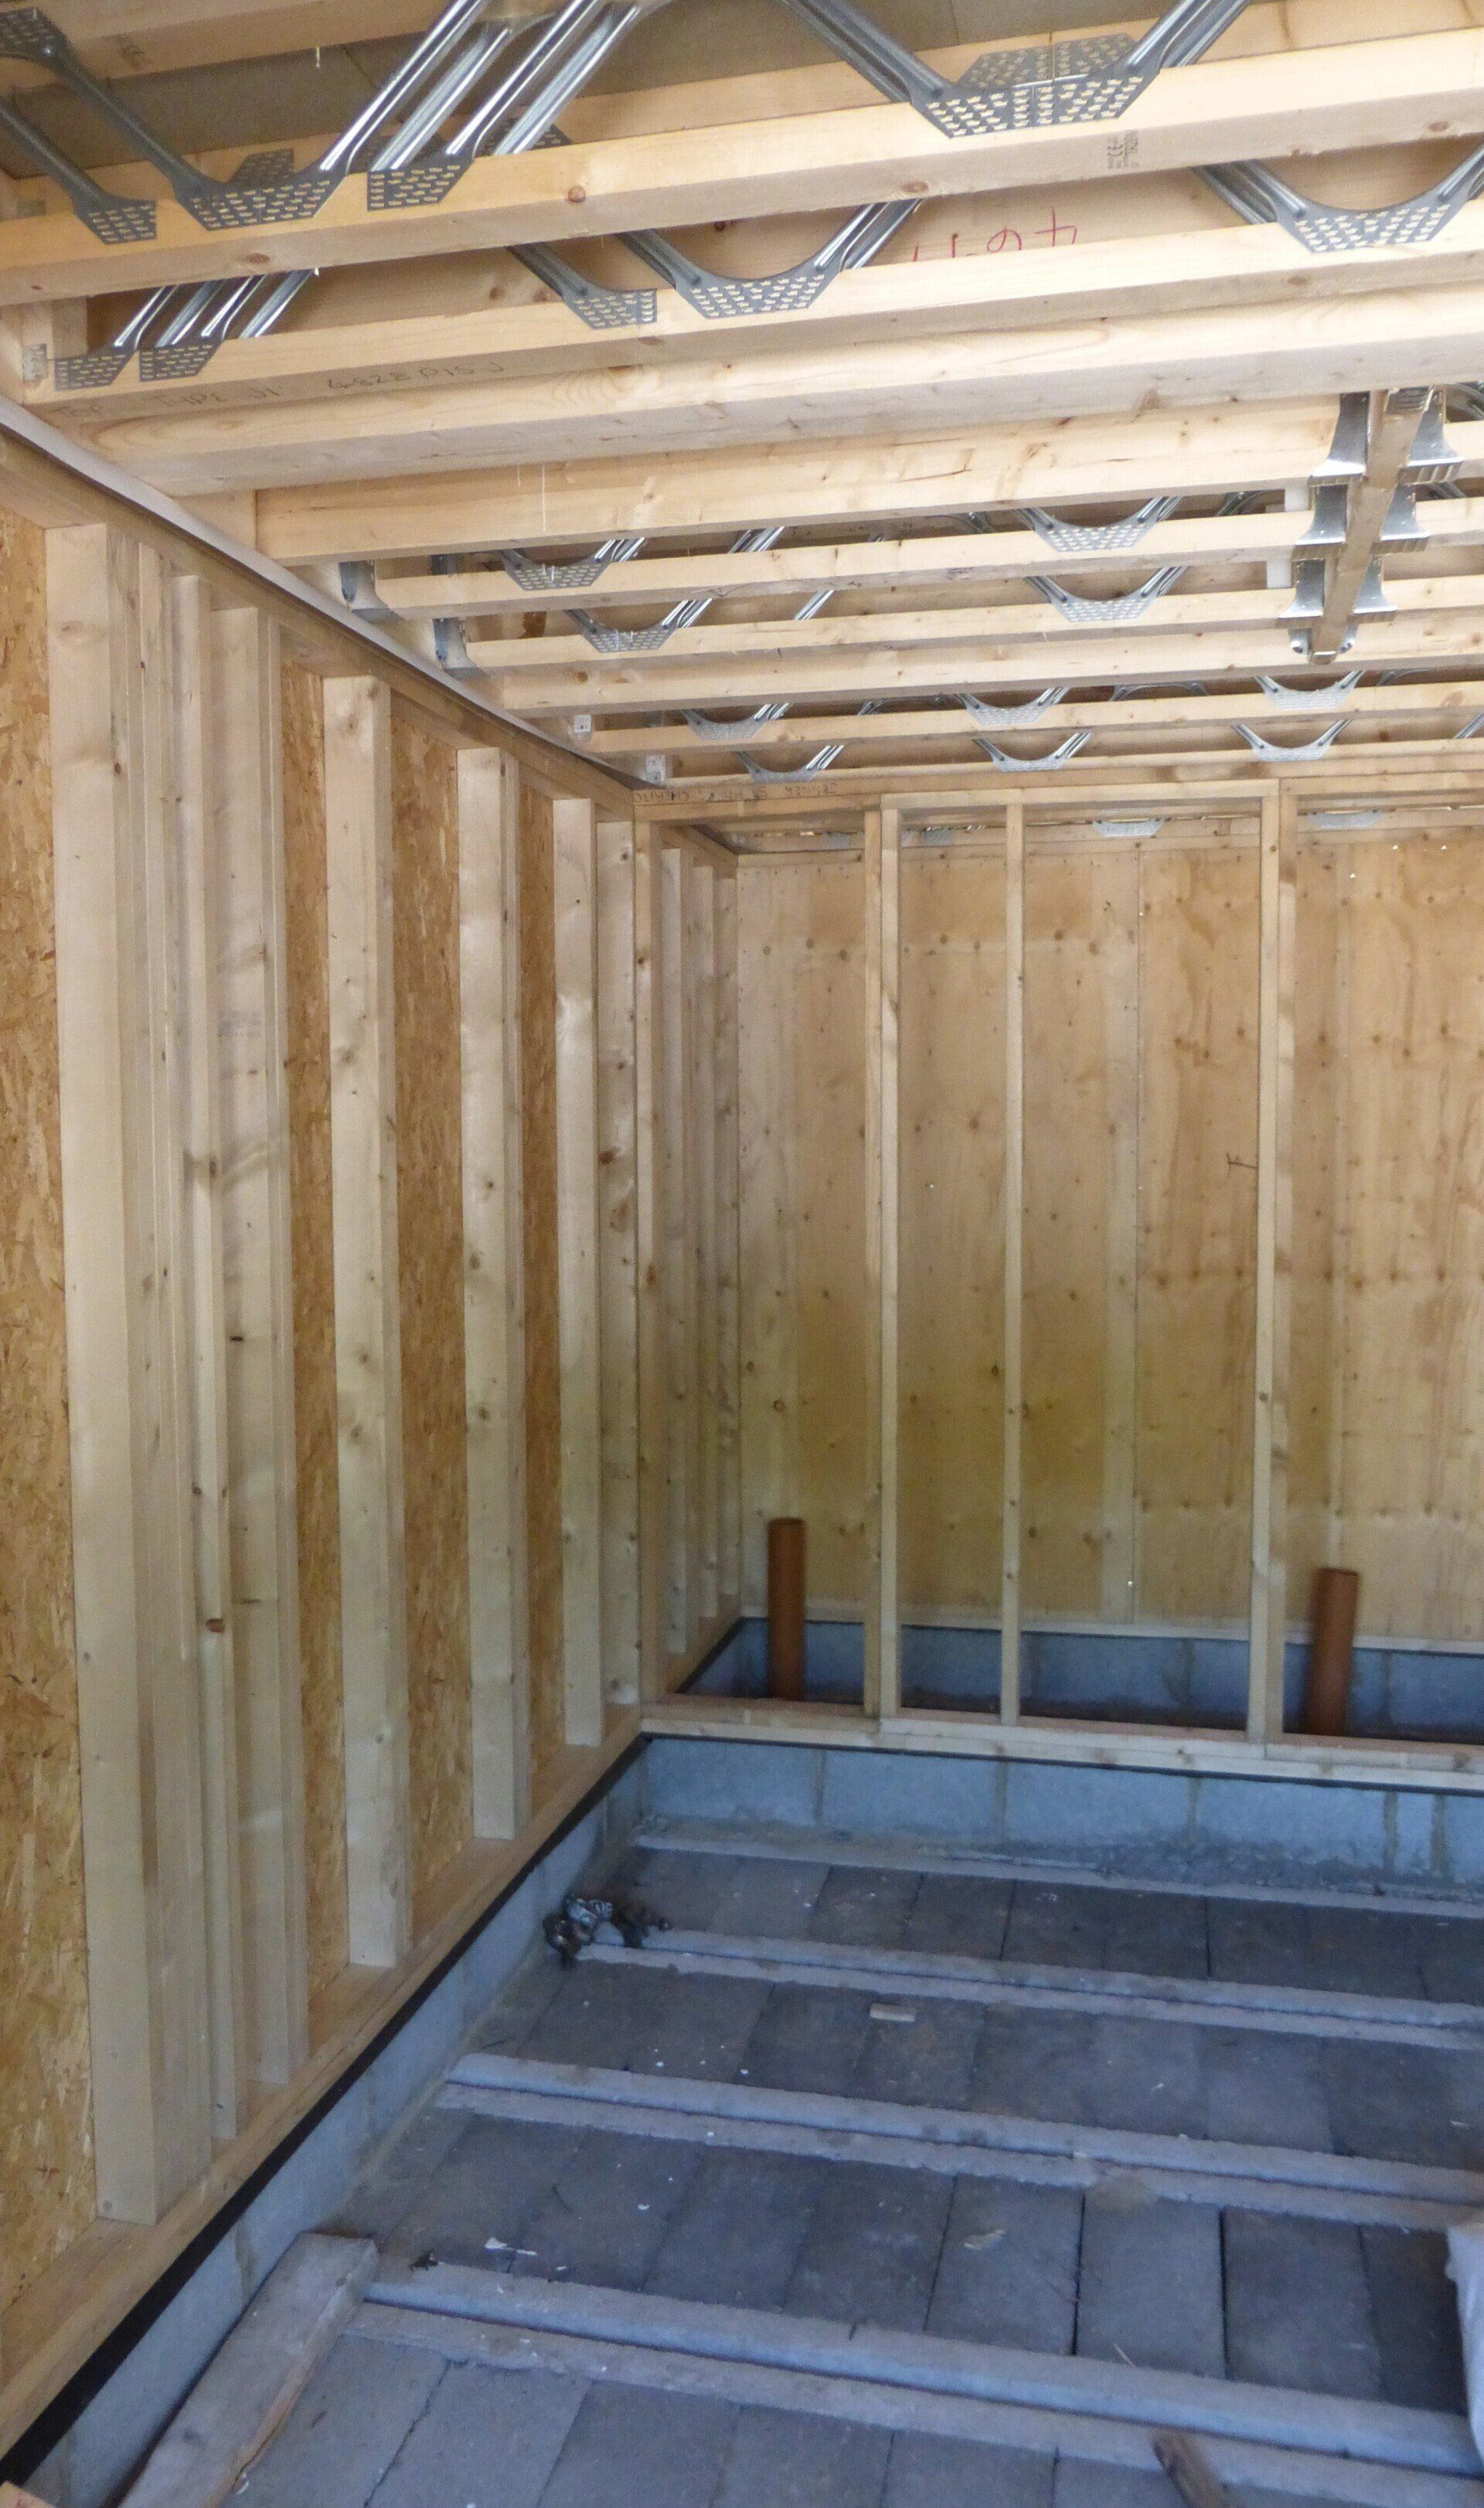
Once the structure is complete and the roof is on and weathering the build, you can turn to carpentry once again, but before the work starts inside it is worth fitting the roof fascias and soffits (and gutters) so the scaffolding can be taken down. Carpentry 1st Fix Fascias and soffits. If you are unhappy at the thought of maintaining timber fascias and soffit boards around the edges of your roof, then cellular pvc-u is a good alternative. Plastic windows might be declining in popularity, but plastic fascias and soffits are on the increase and can be found in grey or black as well as white. Not only are they decorating-free, the material is easier to wipe-clean, compliments the plastic guttering it supports and is a joy to cut and fit. It may not be wood but this is still a carpentry job. This lightweight cellular material is inexpensive and easily cut with a hand saw. It also comes protected by a film that you can peel back when you’ve finished, but don’t leave this on too long – it hardens in the daylight and can only then be removed one tiny piece at a time! Fascia and soffit boards come in a variety of sizes and thickness’ but while it’s common to get the right depth, not everybody gets the right thickness. With fascia you need some strength to support the guttering and this means buying the thicker material - about16mm thick. To accompany this material plastic headed nails with an annular shank to help them bite in are used for fixing and these are stainless steel to avoid any risk of corrosion. Plastic has one major flaw, it expands and contracts beneath the sun and fascias and soffits can’t be fitted tightly together without buckling. A 5 mm gap to each board end (making a10mm gap between boards) is needed and this should be covered by jointing strips fixed with mastic silicone to accommodate the movement - they shouldn’t be glued. One other issue, in cavity walls where cavities exist unfilled by insulation, the top of the cavity is closed with a cavity barrier to prevent fire spreading into the roof space. Used in timber frame houses cavity stops of mineral fibre en-sleeved in tubes of red polythene can be bought for this very purpose and pinned in to place to make the job easier. Before plastering begins the stairs are installed and you no longer have to climb a ladder to the upper floors. Stairs One of the feature elements of a self-built home that often set it aside from developer-built home’s, is the staircase. For many self-builders the chance of making a real showpiece of the stairway is too good to miss. It can create that ‘wow’ factor when you enter the home as a first and lasting impression of the property. The reason why developers don’t splash out on the stairs are worth noting however. Not only are purpose-made stairs at least ten times the cost of a straight ‘off-the-shelf’ flight, they also take up valuable living space and that comes at a premium. Starting from a hundred pounds for a straight flight made from MDF steps and raising to several thousand pounds for a purpose-made winding stair in hardwood you can spend what you like on this element. Ash and Poplar are both commonly used in stair construction, it turns beautifully for ornate balusters and when steamed the wood can be bent to form curved handrails but the choice is endless. For the best finish I don’t think you can beat and Oak staircase with American Black Walnut handrails and tread nosings that polish up superbly. The geometry of a staircase is governed by maximum 220 mm step heights (risers) and minimum 220 mm widths (goings) as well as by a pitch limited to 42 degrees and a ratio where twice the height plus once the going should fall between 550 and 700mm. For you to safely ascend and descend, all of the treads must be equal. If you’re having a staircase purpose-made by a joiner then it is worth having their fabrication drawings approved by your building control surveyor before it is made. Handrails have to be fitted at 900 mm high to protect exposed edges with balusters (a.k.a spindles) no more than 100mm apart, but there is a surprising amount of design choice for these. If vertical spindles don’t work with your contemporary design, solid guarding might or for the impression of an open stairway, toughened glass frameless screens as guarding. Although the carcass of the stair can be installed at 1st fix stage, before the walls are plastered, the newel posts and railings should wait for 2nd fix. In any event it pays to protect the stairs as soon as it is installed with cardboard covers taped to treads and bubble wrapped handrails and balustrades. Carpentry 2nd Fix Internal Doors Internal doors have become a lot easier. You can now not only buy them pre-finished but also pre-hung in linings if you so desire. In this form they are screw fixed in openings with shims as necessary packed between lining and wall to ensure they go in plumb and square. Two 75mm hinges are sufficient for most doors if you are hanging them yourself, but fire doors should always have three and normally 100mm. Dressing the finished door with ironmongery, stops and architraves should always be done carefully with mortised housings and sharply mitred joints. It is these features, and decorative pieces like door surrounds, that will show in your completed home and make it special. For better access 838mm wide leafs are needed (not the industry standard 762mm) and these are required for compliance on the access level of all new-build homes. Timber floor finishes This carpentry task could be the last job you do before moving in, but as an alternative to cement and sand screed, timber floor finishes are increasingly popular. They reduce the amount of water introduced to your construction and provide a warm dry deck to the floor when placed directly over the floor slab insulation. Floor boarding, in the traditional softwood tongued and grooved board form, has the unique advantage of being accessible for maintenance, but it will need to be mechanically fixed down to timber battens (anchored down in the case of a concrete floor structure) or joists. You can pull up individual boards to get at pipes and wiring in the floor without having to raise the floor across and entire room. Engineered flooring tat takes the form of larger interlocking boards tend to float as a finish and are not fixed down at all. Solid floor boards with a finish that you can admire are popular and come in a variety of species from softwood to American Oak and Chestnut. These products at the top end are available as solid natural wood, albeit laminated wood, to provide the cleanest and healthiest of floors. At something like 25mm thick the boards are dense and very strong and intended to be laid with joints glued or simply locked together to form a floating floor. The skirting boards once fixed around the room’s perimeter are all that pins them down. Be aware that although the material is sold ‘kiln-dried’ if introduced to the damp air of a newly built home it will still cup after being laid if it isn’t left to acclimatise first. Timber does need to be able to expand and shrink through the seasons, even indoors and a generous expansion gap around the walls beneath the skirting is essential to stop it bowing up later. Laminated flooring with a finished wood effect top layer that is lacquered with acrylic for cleaning is still very popular and you can still buy artificially faced chipboard laminate for less than carpet underlay. As carpets contribute to indoor air pollution by harbouring dirt and dust and dead skin a finished wood or laminate floor, that can be swept or wiped clean, the rest of the room is a cleaner option. If you suffer from asthma then hard floor surfaces like this are essential. For your bathrooms and kitchen, ceramic tiles can now be laid over timber floors with the advent of flexible tile adhesive and grout that retains a rubbery nature instead of setting hard and brittle. You do still need a well fixed timber deck beneath them and chipboard flooring pinned with nails isn’t good enough. An overlay of WPB (waterproof bonded) plywood, glued and screwed down to over the chipboard is essential if you haven’t planned on a tiled floor to begin with and used 18mm plywood as the sole decking. Skirtings Although skirting boards and architrave are available in MDF (medium-density fibreboard) softwood remains the preferred material. Pinned in place with loss-head nailing and backed up with grab adhesive it can be effectively filled, sanded and painted to a high finish. External angles need to be perfectly mitred to show them at their best, but internals can be scribed (rather than mitred) to overlap the profile of the board. If you do use MDF, make sure the plaster and floor screed has thoroughly dried out though and the place remains ventilated for much of the day. MDF can quickly become covered with black-mould, even more so than timber, when left in a damp environment. Kitchen fitting Kitchen units should also be considered as 2nd fix carpentry, although usually by specialist firms it pays to wait until the plastering is complete before the kitchen is measured for the fit out. You could of course do it before, and even off plan, but the risks of it not fitting are always present when you do.
U-Values and Heat Loss You may already have encountered the U-value in your building project and felt its significance. But did it leave you wondering - what exactly is it and why is it so important? What is a U- value? Simply put it’s a measure of the speed at which heat can transfer (escape) through any element of a building, whether it be a wall, floor, roof, or indeed any component of the structure. Because the construction of these elements can vary so much with design and the choice of materials available, U-values can vary too and hence they need to be calculated specifically for each element. In practice, the manufacturers of insulation will provide examples of the U-values that can achieved when using their products in a variety of constructions and some even provide a ‘U’-value calculator on their websites for you to play with and check your own. The units used to express U-values are watts per metre squared Kelvin (W/sq.mK) This means that if a wall for example, had a U-value of 1.0 W/sq.mK, for every degree of temperature difference between the air on the surface inside the wall and the air on the surface outside, 1 watt of heat would pass through any square metre. In the fight against climate change, reducing carbon emissions from buildings has been critical. Largely that means better insulation. Measuring and controlling it, the U-value has traditionally been the weapon of choice but for new homes and extensions with lots of glass, more holistic SAP calculations may be needed that assess (in theory not practice) the carbon emission per year. How are U-values calculated? Most materials have known and published values for the rate at which heat is conducted through them under specified conditions. These values are known as k- values. They are a measure of thermal conductivity. In any element, such as a wall – the k-values for each material layer are divided into the thickness of that material to obtain the R-value for that layer – or the thermal resistance. When they are added all together, the total resistance for the complete section of the wall is nearly found – I say nearly because the air resistances for both the inner and outer face have also to be added on. The total resistance is then divided into 1 to obtain the reciprocal of resistance and this figure is the U-value for the wall. What are the consequences of getting U-values wrong on site? Since materials may vary in their k-value even though they look the same, selecting the wrong one may have a bad effect on the U-value. For example, a mistake frequently made on site is to choose an inner leaf block for a cavity wall that may appear the same as the one specified, but in fact has a higher crushing strength and a worse (higher) k-value. The resultant U-value may mean that if the wall has to be lined internally with more insulation beneath dry lining plasterboard to recover the U-value. Do the Building Regulations require maximum U-values to be achieved? Part L (Requirement L1) to the Building Regulations covers ‘Conservation of Fuel and Power’ and U-value maximums have traditionally been set by these regulations. They still are in the case of extensions, but for new buildings a more holistic approach has to be taken to prove reasonable energy efficiency. Whole building calculations that assess the carbon emissions from a building have to be carried out now, and although ‘U’-values are included in these assessments, they form only a part. For conversion work, threshold values are used for the existing elements to be compared against. If any exceed these threshold values, the element should be improved with more insulation up to the current standard. So what is a good U-value? Remember - The higher the figure, the worse the thermal insulation quality. So aim to keep your U-Values low and less than the figures below which are the current maximum values for elements in Approved Document L1B - 2010 edition (England &Wales) Maximum U-values External Walls - 0.28 Pitched Roofs insulated to horizontal ceilings – 0.16 Pitched Roofs insulated to sloping ceilings – 0.18 Flat Roofs – 0.18 Ground Floors – 0.22 Windows – 1.60 Doors - 1.80 Be wary of some window companies quoting centre-pane values or Window Energy Ratings (WER) in Bands A to G as an alternative, which takes account of the frame as well as the glass. Aluminium windows can be poorly insulated through the frame. In some countries like the USA, windows are rated with R-values (which makes more sense as they applies to the whole window unit) U- values are discovered by adding up all the R-values of thermal resistance in an element and then taken the reciprocal of that total. Limiting U-values Because whole-building energy calculations can take account of many factors, U-values in some elements can exceed the values shown in the table above and be compensated for elsewhere in the design. But not to an unreasonable extent, there are limits. The area –weighted U-value method les you multiply the area of each element by the actual u-value and compare the resulting total heat loss against the same process using the individual limits. This approach can also be sued in glazed extensions with lots of windows (read the blog on glazed extensions for details) They exist to ensure that some ‘future proofing’ is built in to the home, and that you haven’t completely downgraded external fabric insulation by using sustainable sources like solar panels or wind-turbines to generate your own fuel and power, only to discover that future owners replace them with heating oil or gas. For new home builders and extenders it still pays to build in the highest levels of insulation you practically can and reduce the dependence on space and water heating. e body content of your post goes here. To edit this text, click on it and delete this default text and start typing your own or paste your own from a different source.
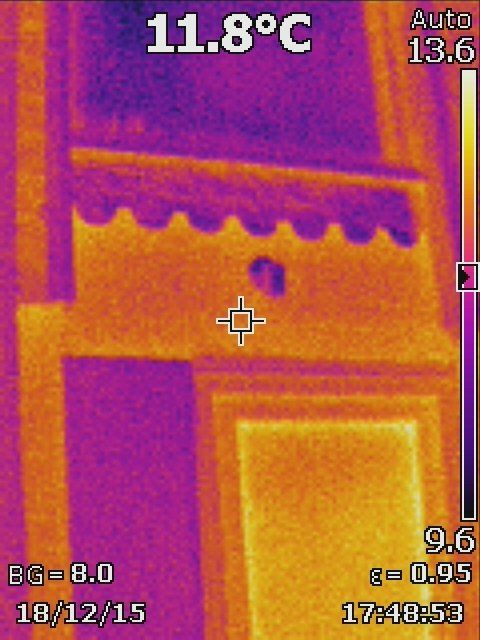
U pgrading Conservatories Traditionally built of windowed walls and a roof that is glazed by polycarbonate or glass, conservatories have been a cheaper lightweight bolt-on addition to homes. Raised from a shallow or slab foundation, they are exempt from the Building Regulations entirely and have been since the 1980’s. Like porches these exempt conservatories are not considered to be part of the permanently habitable zone of a house and hence they can be built without application or reference to the building regulations including the heat loss requirements. They have become an unusable space for some. Too hot in summer, too cold in winter. Before we look at what can be done to improve them, it is worth recognizing what the conservatory is as far as the Building Regulations are concerned, because upgrading them is ‘controlled work’ that needs to comply. So what are the differences between a Conservatory and a glazed extension? For an extension to be defined as a conservatory it must have a significant proportion of the walls and roof glazed. Although the government doesn’t specify what ‘significant’ means it is usually accepted to be 75% of the roof and 50% of the walls. But there are also other less desirable conditions for them to be regarded exempt; They have to be ; • Under 30 square metres in floor area • Added at ground level (not to enclose an upper floor balcony for example) • Separated from the house by thermally insulating construction (e.g. insulated walls, double-glazed windows, patio, bi-fold, external doors) • Without any fixed heating unless it is isolated from the rest of the homes heating system • Fitted with safety glazing in the critical zones of doors, side door lights and low windows to Part K standards Without proper foundations and a lightweight plastic roof many exempt conservatories have proven to be temporary short-lived structures that can end their lives leaking rainwater from poorly weathered joints, cracking from ground movement or even being pepper-holed by hailstorms. Those that survive longevity can be abandoned for much of the year, being too hot in summer and too cold in winter. I have seen south-facing conservatories buckled from the heat, with bleached furnishings and cracked floor finishings. Not surprisingly, the owners had given up using them and are looking instead to replace or upgrade them. Upgrading is not always easy but a recent trend to replace the roof with a lightweight composite and yet solid one is being marketed nationally is taking hold. Something that is both properly insulated and solid, rather than translucent or transparent, will block out the sun’s rays and keep the heat in may be worth considering but there are some issues to overcome on the way. Converting to a solid roof Replacing a conservatory roof structure is defined as material alteration work and hence included within the requirements of the Building Regulations. Hence this project should be the subject of an application for control and a certificate on completion. Some of the national companies undertaking conservatory roof conversions have adopted a system approach and have partnered with Building Control Bodies to ensure they have a nationally approved design they can follow wherever they are working. With travelling tradesmen staying locally in digs, these companies tend to work speedily and in most weather, but having the windows and new structural elements of the roof inspected and passed is essential before they complete the work and move on to the next job. The conservatory roof conversion lends itself to the sales orientated double-glazing market so take the usual precautions, avoid inviting reps into your home, avoid the sign now offer after the managers bargain discount has been applied for today only. It remains deeply embarrassing that the industry still feels these hysterical charades are acceptable today but I’m afraid it is still very much the 1980’s in this business, but most of all and if you do decide to buy – read this first ! One of the issues with exempt conservatories is that most were built exempt from any building regulations or codes, with plastic roofs that made them unsuitable for habitable use. These polycarbonate roofs in particular and sometimes even or glass roofs are likely to only be supported by the windows from thin glazing beads and these will likely be unsuitable to act as rafters supporting the new solid roof. Replacing the beads with stronger I-shaped profiles that have a wide top flange capable of supporting the new roof is the first element of the project. Others, install something even more substantial such as timber rafters alongside the existing beads and this is where things become tricky. Timber of course has strength but as alive material it is prone to twist and warp as it dries out and hence it needs bracing and fixing in place. It also needs supporting at the end bearings and simply can’t be screwed alongside the existing glazing beads for support. At the eaves, support might be absent if the walls are all windows and hence an arrangement of lintels and posts could be needed. For many years the designers of sun lounges and garden rooms where traditional heavy tiled roofs sit over windowed walls, have built this way with beams over the windows bearing on corner posts that frame them and transfer the roof weight down to the walls or foundations beneath. Conservatory roof conversions aim to avoid all that re-building by using lightweight solid roofs of either moulded resin sheets with the appearance of tiles or composite lightweight slates. The insulation is usually provided by the either multi-foil laminate quilt or phenolic foam sheets over plywood sheeting creating a warm roof without a cold void that needs ventilating. As lightweight as all these individual elements may be it is adding up and finally of course a ceiling finish will be needed. The weight is certainly greater now than a polycarbonate plastic roof but perhaps equal to one double or triple-glazed in toughened glass. And so the windows that supported the roof before are now being asked to carry a heavier load and this needs to be considered. If they are PVC-u windows, the frames profile will need to include steel reinforcing inside and hence some discrete pilot-hole investigation may be needed or magnet testing to confirm this. Without a steel core reinforcement, changing from a polycarbonate sheet roof to a solid one, will require replacement windows or a new supporting framework With most of the heat-loss escaping up through roofs, the alterations will help but the roof of course was only one element of the conservatory and because the remaining structure will still be considered lightweight and possibly over-glazed with windows (more than 25% of floor area) the accepted approach is for them to remain thermally separated from the main house with insulated doors and windows. Effectively you will end up with a completion certificate for a replacement conservatory roof, the same as if you had replaced the roof of an exempt front porch for example. They will make the existing home darker because this project will not create a habitable extension that can be made open plan to the home; the separating doors must remain in place. Either that or it is going to need a bit more work than just the roof. Even so, if you find yourself sitting in a pizza-oven on a summer’s day with the furnishings disintegrating around you or shivering over the Christmas lunch, this could be the perfect project for you and one where you can still enjoy the garden if not the daylight all year.
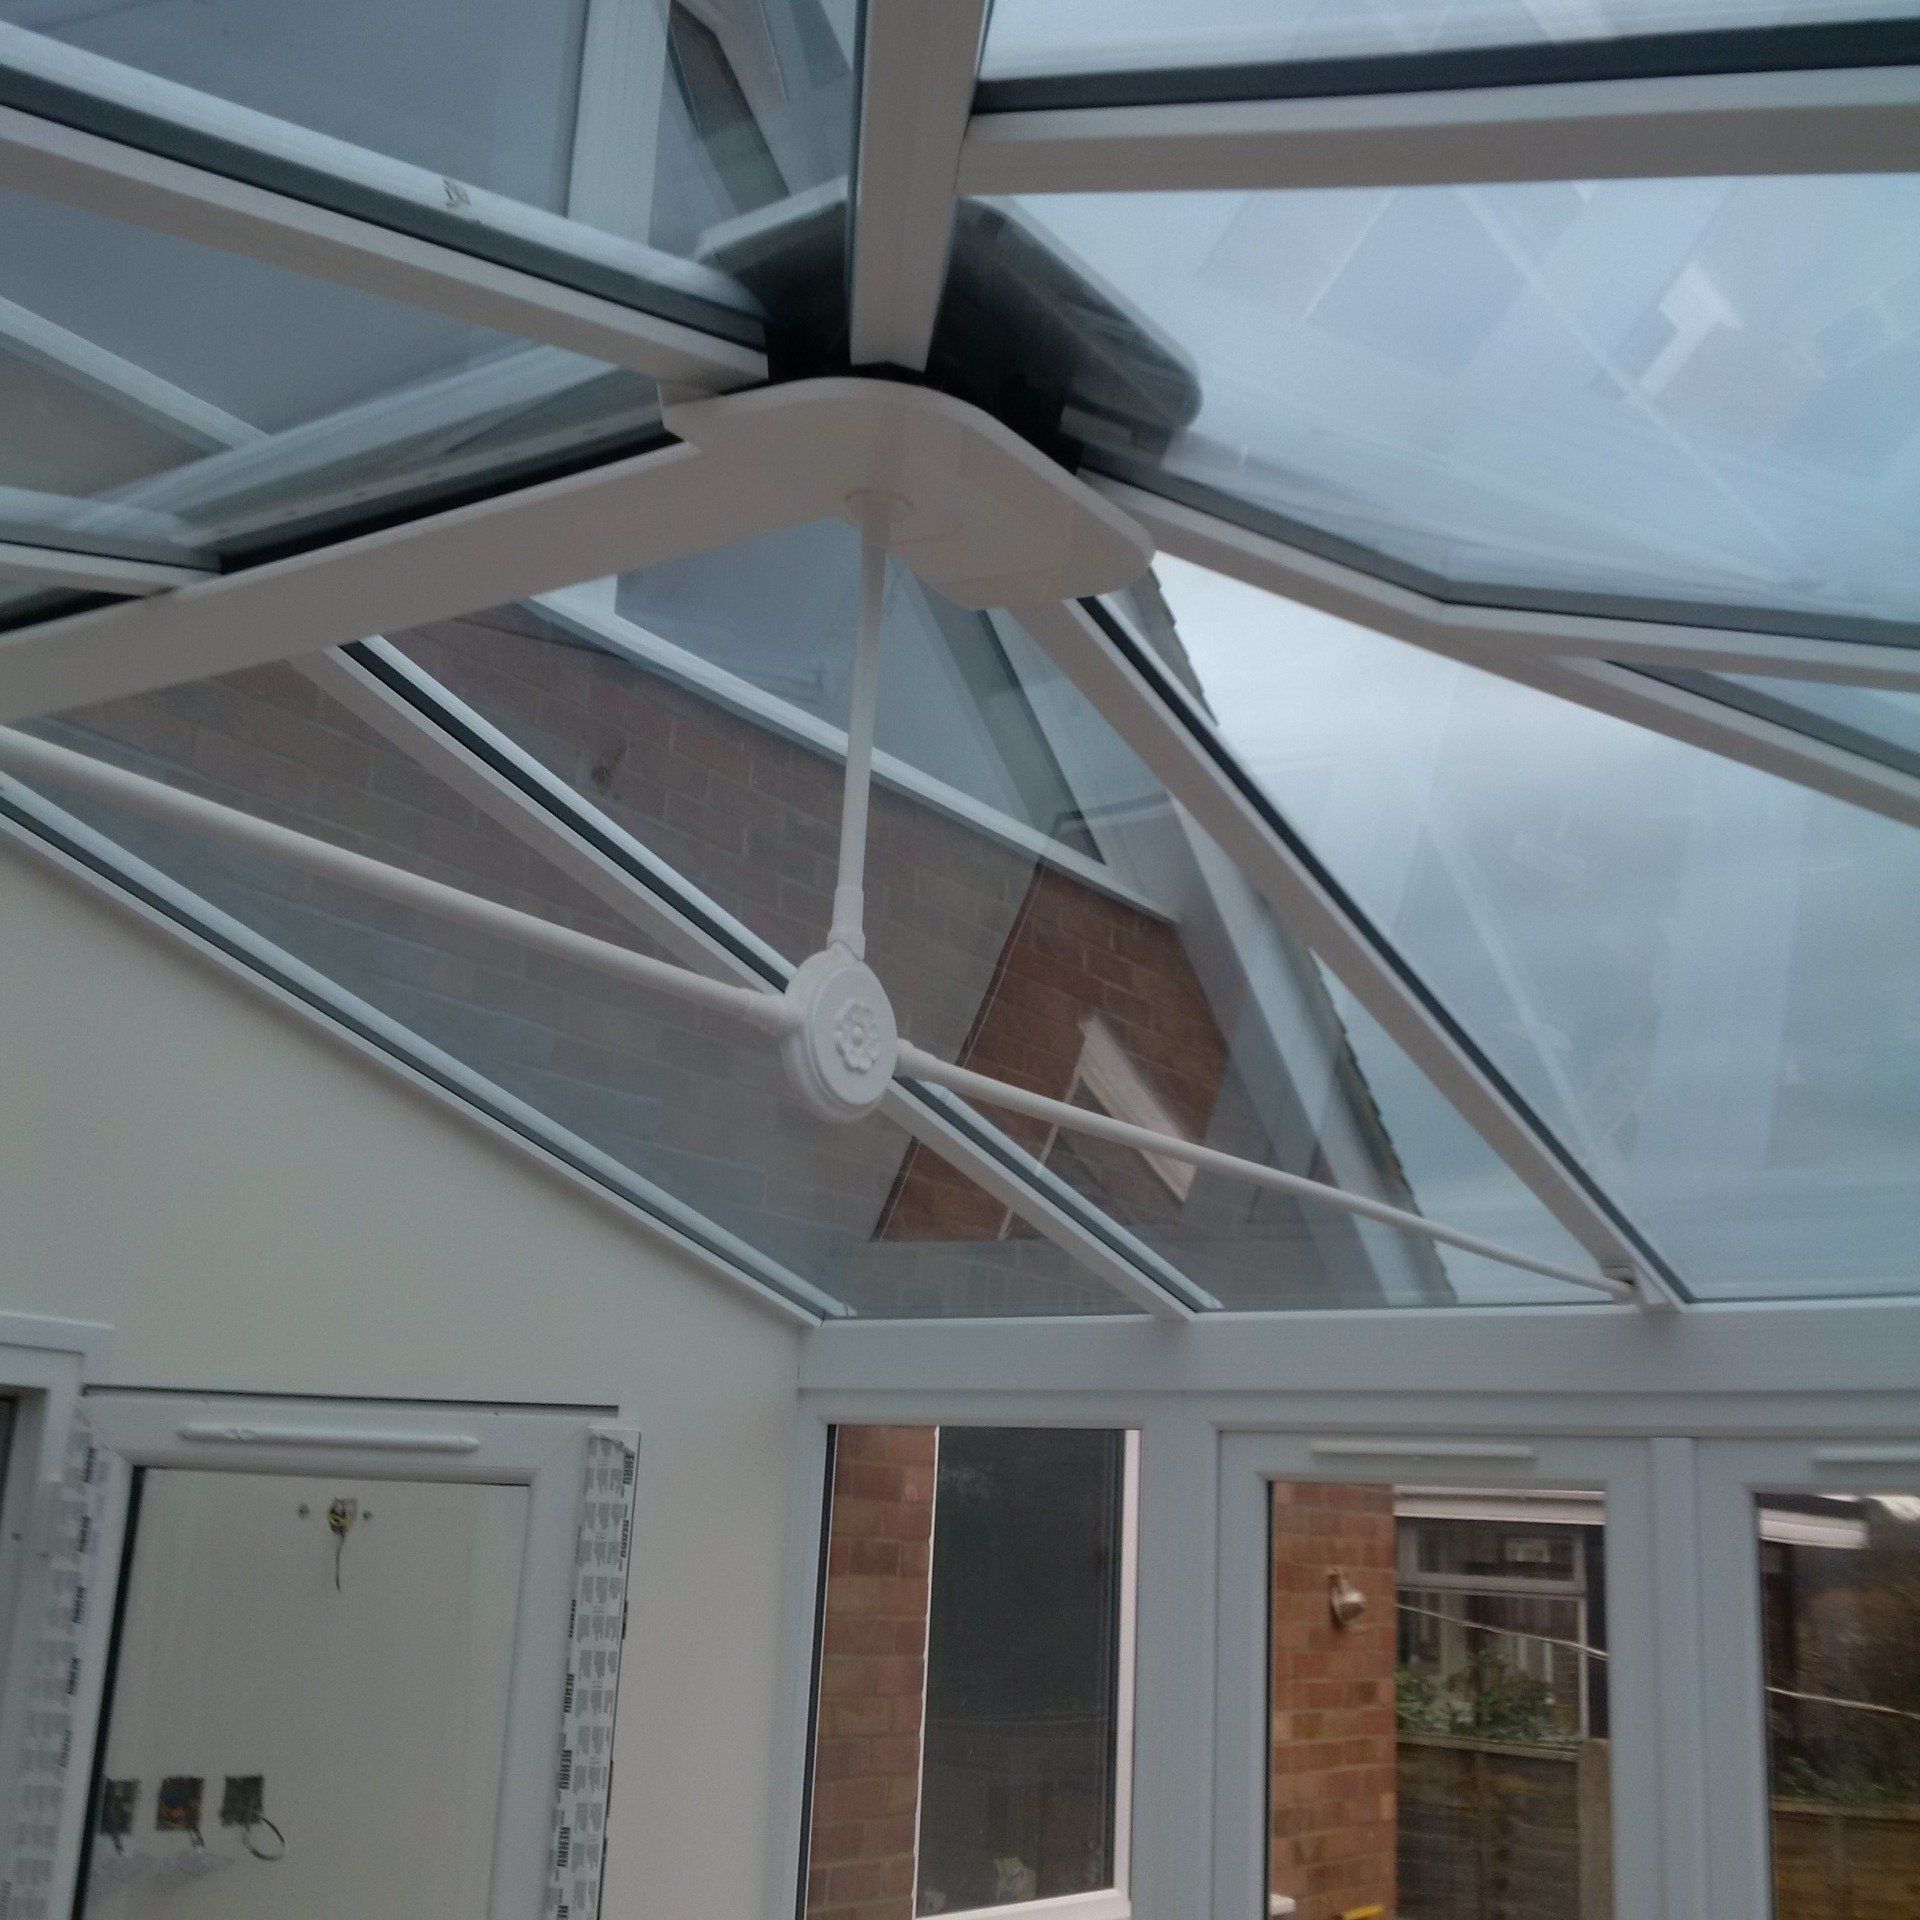
Building with Glass – Conservatories and Glazed Extensions It seems that almost everybody wants a home with plenty of daylight now and with improvements in the thermal insulation of glass and roof light styles it is achievable. Brightly lit conservatories, orangeries, sun rooms and garden rooms can suit our temperate climate well and bring us as near to the garden as we can be when the weather stops us from actually being in it. Apart from creating a Segue between the outdoors and in, letting in daylight makes environmental sense as well as improving our well-being, but to get more light through into our homes it is better to have windows that face the rays square on and pitched roof windows or lantern lights are best. If the light ways are reaching the glass at an acute angle, a fair proportion of them will simply bounce off as reflection and so rooms with just pitched roof lights are often brighter than those with just windows. The distance to which light will reach inside is limited with the height of windows, but rooflights allow you to extend out further without depriving the existing home of light. If you yearn more for the view or a connection to the garden, glazed folding or sliding doors and storey-height windows that reach from floor to ceiling are the answer. Heat Loss from the Glazed Extension For those wanting to extend living space with brightly day lit rooms, building an extension with plenty of glass in both the roof and walls seems the solution. But there is a problem with reaping natural light. Double glazing has improved on what it used to be thirty years ago and yes it may be great for letting the light through but it also great at letting heat escape out through. For every square metre of window the rate at which heat passes out through it, is typically two or three times that of the wall itself and for a roof window it is more likely to be eight times that of the insulated roof. Even so, the insulation values have greatly improved and with gas filled cavities and heat (low-e) reflective coatings, we now have windows that have the same insulation value as a nine inch solid brick wall. It will not be long before they compare to the cavity walls of the 1970’s. As a consequence, the use of glass in extensions is limited to meet the energy efficiency standards of the Building Regulations. Even so, it is possible to extend with a permanently habitable space that fills the home with both light and warmth. It just requires some careful design. Home Extensions are checked for compliance with requirement L1B (energy efficiency) on an elemental basis by applying maximum u-values to each element of external construction. Floors, walls, roofs, but also windows and doors and one additional control to limit the amount of glazing as a percentage of the new floor area to 25%. One quarter of the extension floor area can be used for the total area of windows, rooflights and glazed doors. Bear in mind that you can deduct any existing glazed areas that you will be removing by extending over them. Even so, given the contemporary desire for more daylight in our homes, with glazed roof lanterns and walls of bi-folding storey-height glass doors, many extensions exceed the 25%. All is not lost, but some extra design work is needed to justify the extra glazing and show how it will be compensated for with improved insulation elsewhere. If you find yourself over the 25% limit, Average U-value calculations are the place to start Average U-value calculations In the example shown, a flat roofed extension of 20 sq. m area has a 10 sq.m roof light so 50% of the extension floor area is covered by the roof light. Twice the allowed area. By improving on the allowable u-values, the actual area weighted U-value is still less the permitted area weighted U-value and hence the extension still complies with the energy requirements. Proposed Extension with permitted max. U-values and areas New External wall ……………………………………….. area 40 sq.m x 0.28 = 11.20 Windows (minus removed existing window area) 25% of floor area 5 sq.m x 1.6 = 8.00 New Floor area ……………………………. area 20 sq.m x. 0.22 = 4.40 New flat roof area…………………………………………… area 15 sq.m x 0.18 = 2.70 Total area = 80 sq.m Total heat loss = 26.3 Permitted Area-weighted u- value = total heat loss/total area = 26.3/80 = 0.32875 U-value _________________________________________________________________________ Proposed Extension with actual U-values and areas New External wall …………… ……………………………… area 40 sq.m x 0.22 = 8.8 Windows (minus removed existing window area)… area 10 sq.m x 1.2 = 12.1 New Floor area …………………………………………………… area 20 sq.m x 0.18 = 3.6 New Flat Roof area … …………………………………..........area 10 sq.m x 0.13 = 1.3 Total area = 80 sq.m Total heat loss = 25.8 Actual Area-weighted u- value total heat loss/total area = 25.8/80 = 0.32250 U-value As the actual area-weighted u-value is no worse than the permitted it complies. _________________________________________________________________________ Of course you need to have calculated the actual u-values from your design but insulation manufacturers will help you with these. Some provide design calculators on their websites. If that doesn’t work you can still adopt a wider flexible approach that considers the whole house instead of just the extension by itself. SAP Calculations Undertaken for new dwellings as a matter of course the glazed elements, are all designed in. This is why you can self-build a new home with a glass roofed kitchen for example, whilst the home extender may struggle to justify a glass-roofed kitchen extension of an existing home. SAP calculations can still be used with extensions to illustrate that the total carbon emissions from the extended home are no worse than they would have been if the same extension had been built to just the elemental maximum u-value and area limits. The benefits of SAP calculations over the average U-value method is that they consider the whole dwelling instead of just the extension, and hence they widen the scope for compensating for the extra glass by taking into account energy efficient light fittings and new boilers, as well as heat gains from south-facing windows for example. The downside is that you can’t do them yourself. They have to be carried out by a qualified consultant SAP assessor, but if you are planning to upgrade the existing home as well as extend, they are the best option for you.
